The Revolut integration allows you to synchronize employees in ITFin with counterparties in Revolut and create payment requests in Revolut for compensation payouts based on the amounts calculated in ITFin.
Step 1. Configure the Integration
The setup instructions are available on the Revolut tab in the Payment Sheet section.

We also demonstrate how to connect your Revolut account using the following example:
1)
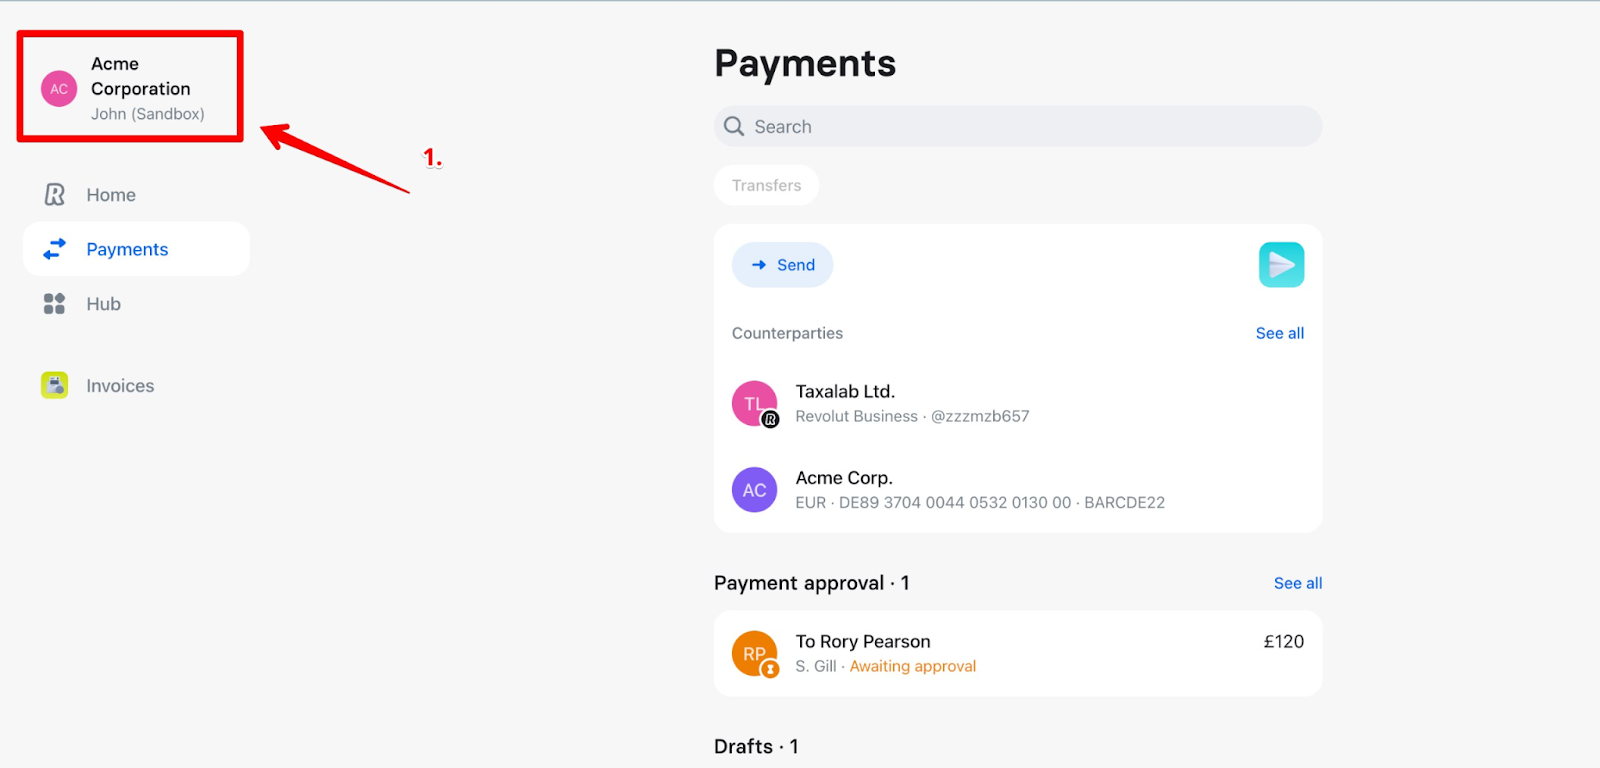
2)
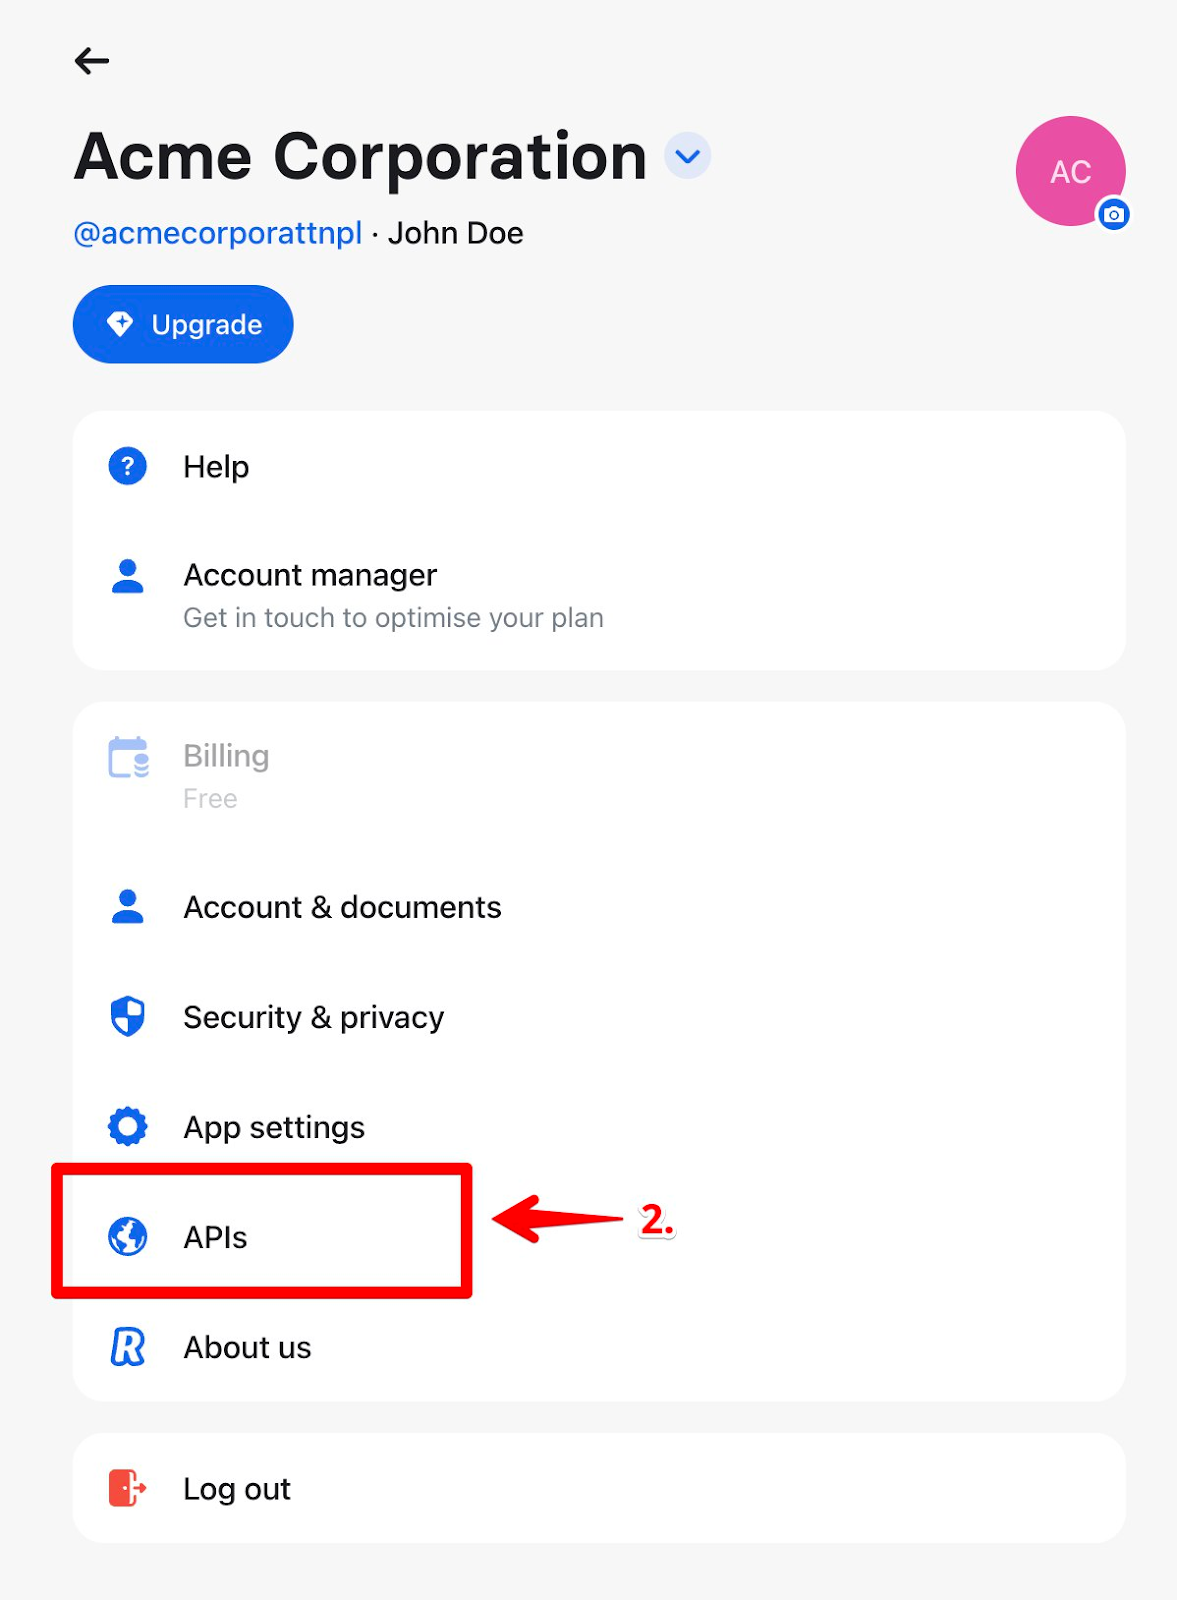
3)
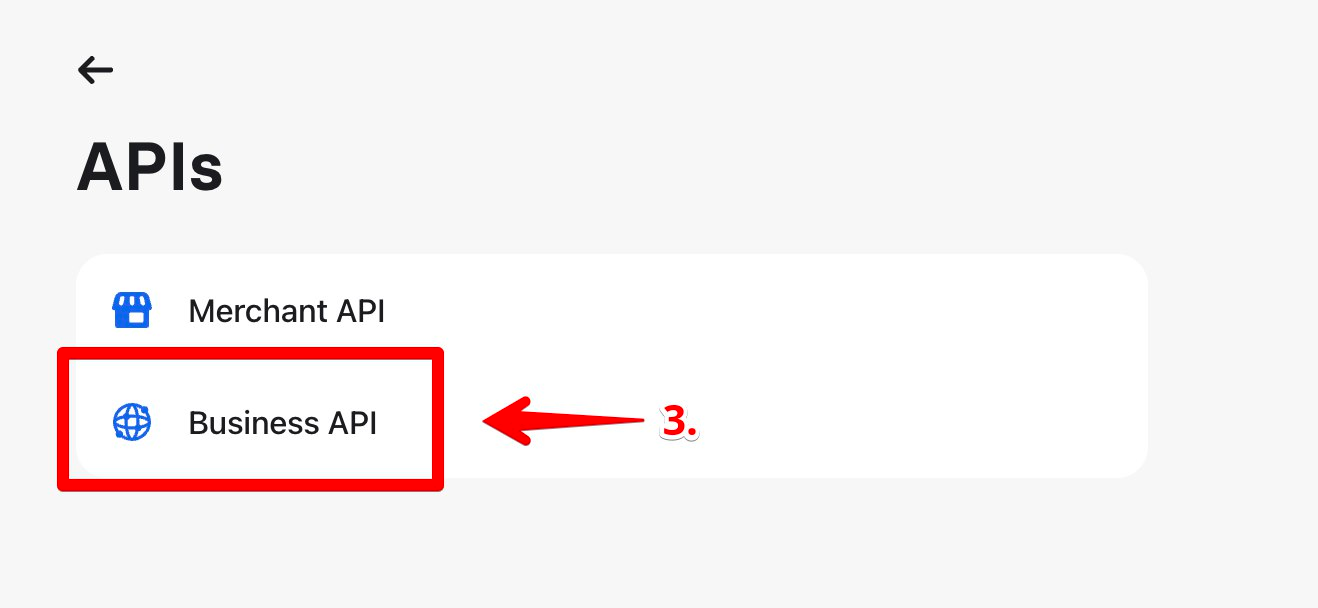
4)
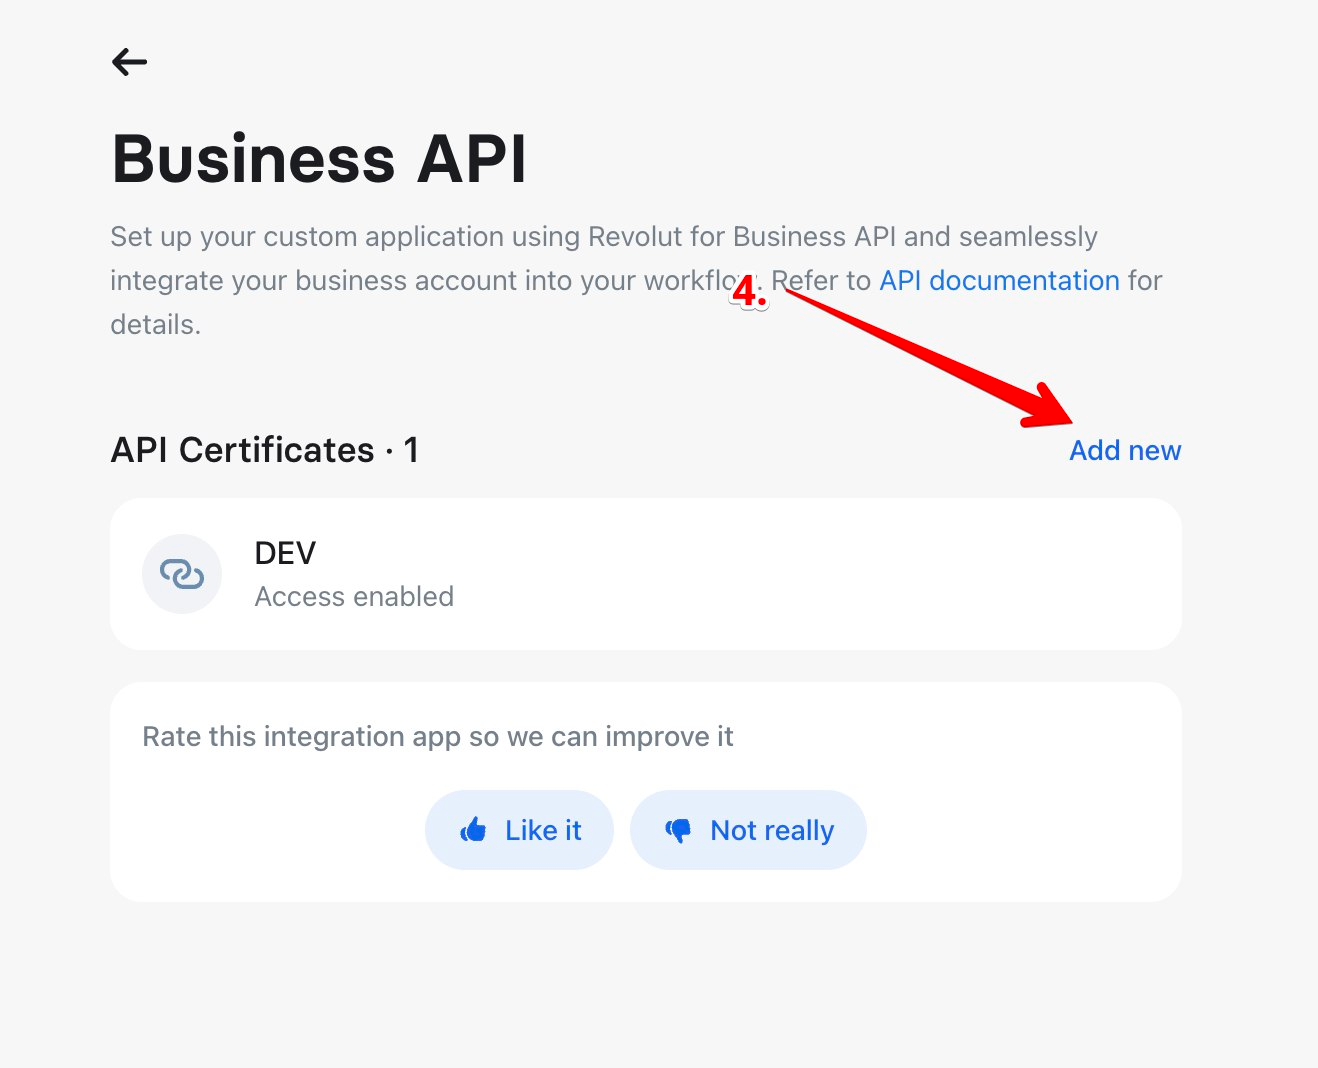
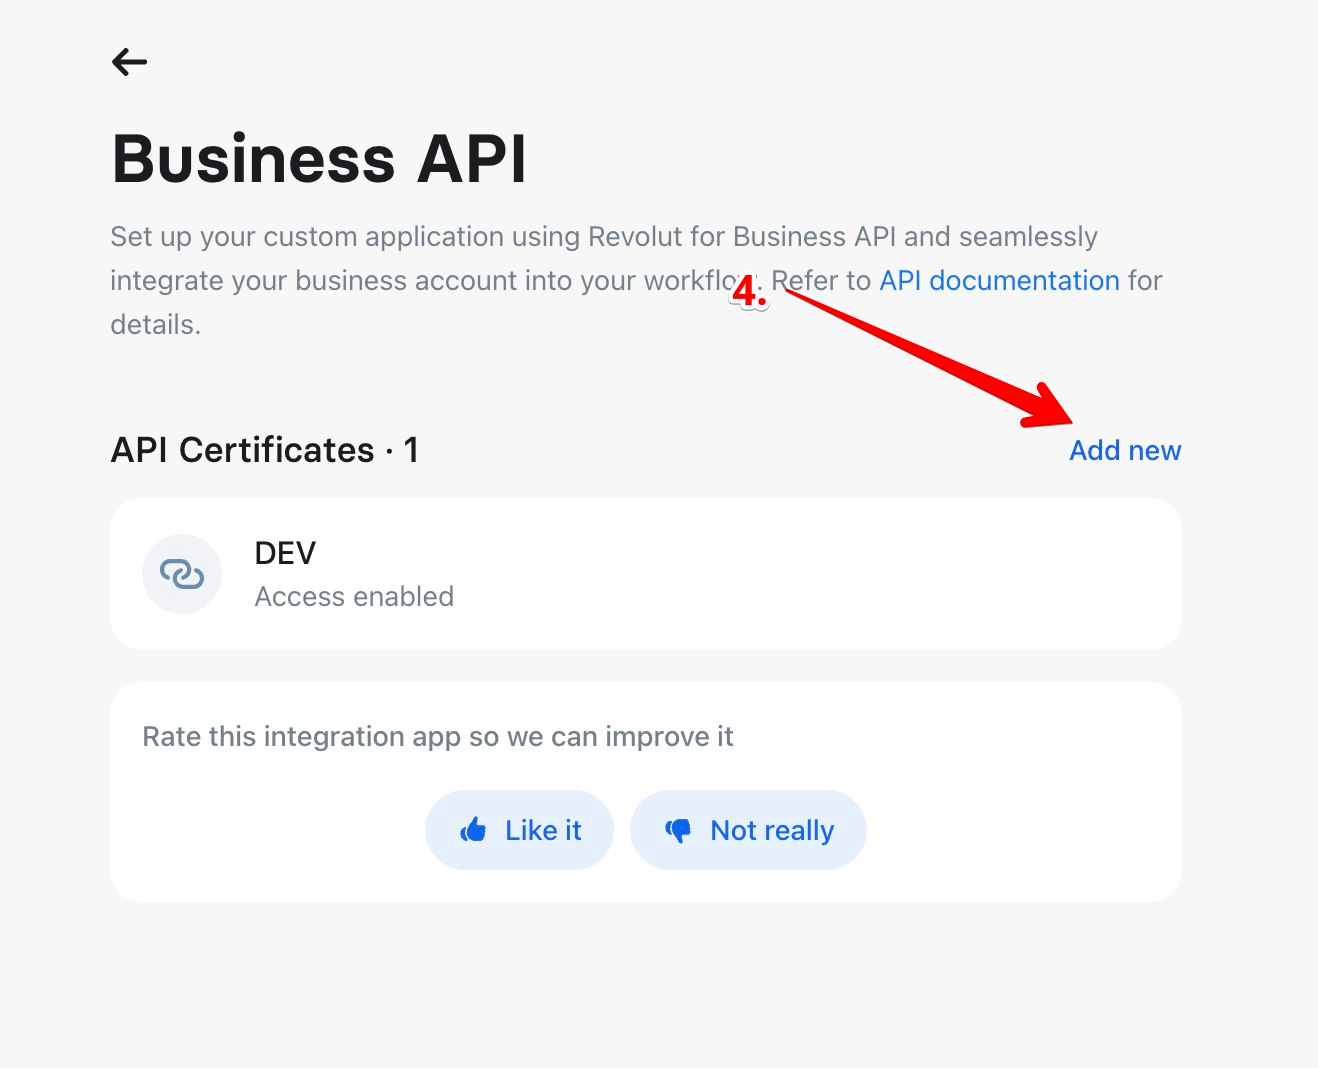
5)
Replace companyname.itfin.io with the domain you use to access your ITFin account.
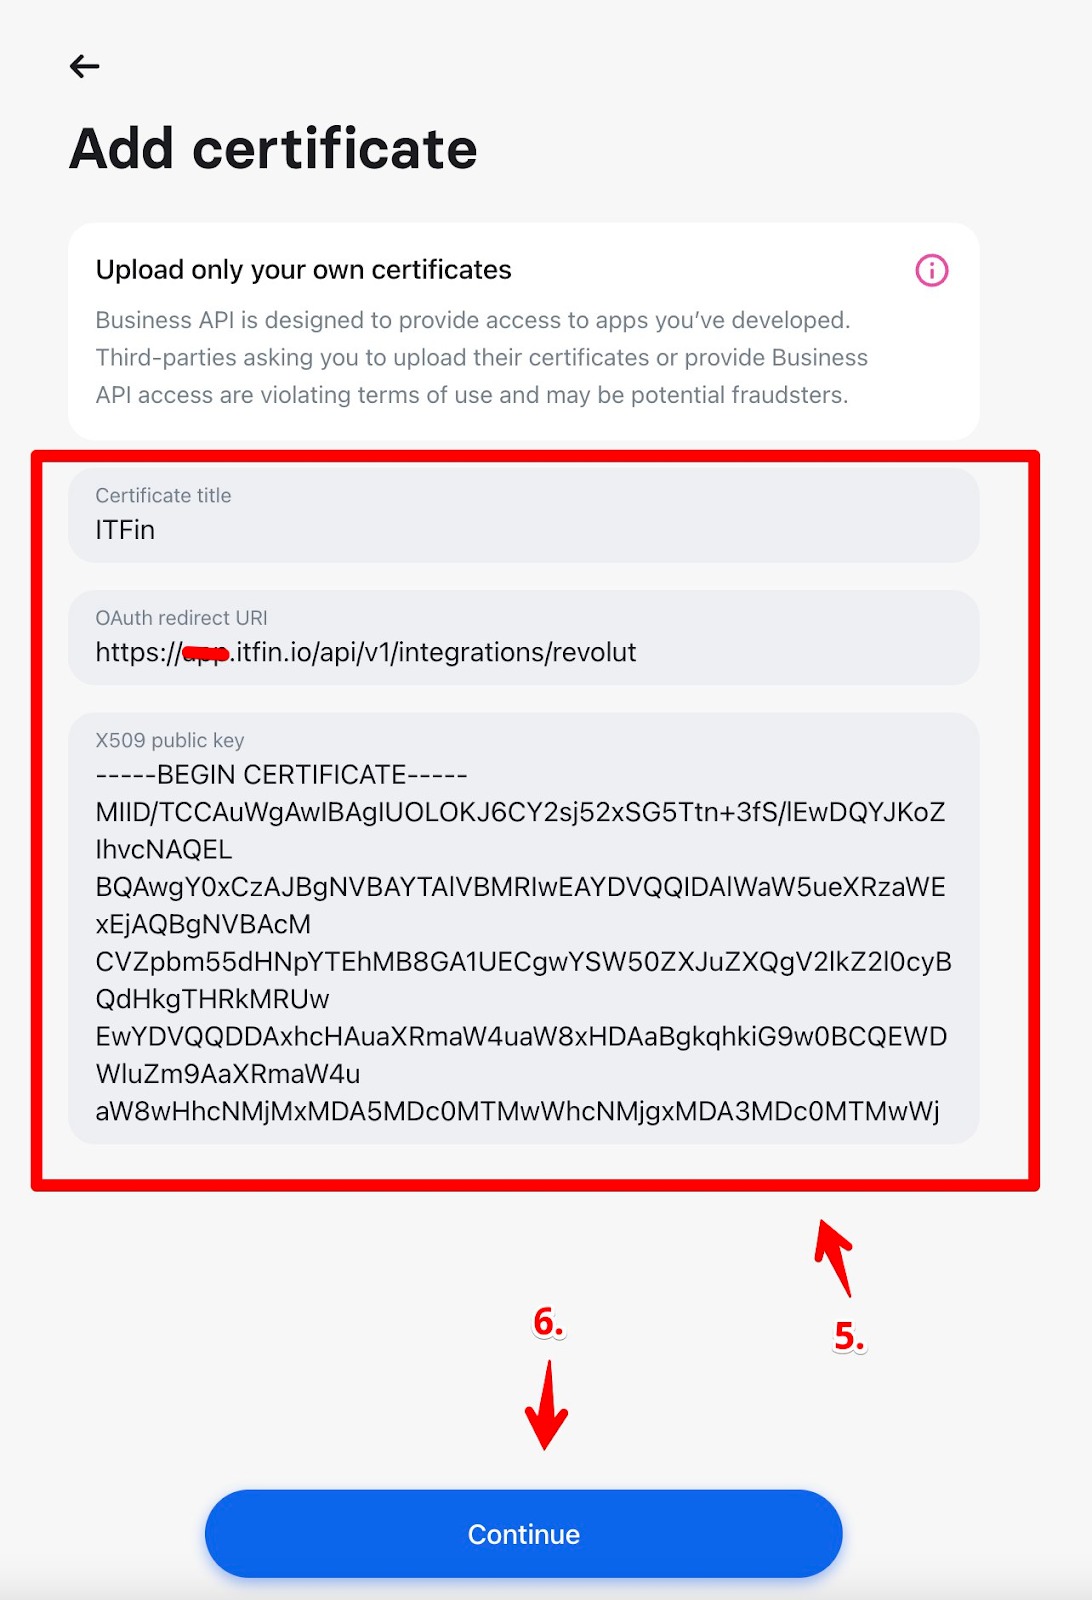
Sertificate title: ITFin
OAuth Redirect URL: https://companyname.itfin.io/api/v1/integrations/revolutX509 public key:
-----BEGIN CERTIFICATE-----MIID/TCCAuWgAwIBAgIUOLOKJ6CY2sj52xSG5Ttn+3fS/lEwDQYJKoZIhvcNAQELBQAwgY0xCzAJBgNVBAYTAlVBMRIwEAYDVQQIDAlWaW5ueXRzaWExEjAQBgNVBAcMCVZpbm55dHNpYTEhMB8GA1UECgwYSW50ZXJuZXQgV2lkZ2l0cyBQdHkgTHRkMRUwEwYDVQQDDAxhcHAuaXRmaW4uaW8xHDAaBgkqhkiG9w0BCQEWDWluZm9AaXRmaW4uaW8wHhcNMjMxMDA5MDc0MTMwWhcNMjgxMDA3MDc0MTMwWjCBjTELMAkGA1UEBhMCVUExEjAQBgNVBAgMCVZpbm55dHNpYTESMBAGA1UEBwwJVmlubnl0c2lhMSEwHwYDVQQKDBhJbnRlcm5ldCBXaWRnaXRzIFB0eSBMdGQxFTATBgNVBAMMDGFwcC5pdGZpbi5pbzEcMBoGCSqGSIb3DQEJARYNaW5mb0BpdGZpbi5pbzCCASIwDQYJKoZIhvcNAQEBBQADggEPADCCAQoCggEBALEtTaV6hYq4+A5lHjG9AWSconHLybwa+/uEjBYaQZEt9/gpMFEsShKE4p+htGJ0vB4jiict/7JZLJWWgty1WNvJK/SYv0A2OPmydijSnsHsGL/Vq6sKZF6YHQg1gc8WxohB5v3PifamkmvMkdq9CEO/RUS86DM6LPfPgFJxQKjrx3vSS/iAuUmt2GPLPiOCdp6a2xdG3Z19rtMBMJ0k8tb4ML9OiIC9AUxPzQ3NWTg4o/52pmHk78H25Soy+vlhm1hKeW3mgyQ4qvtFzdLwy8iVPkXsrwn0PtjU/MKkZ66i0+o1zgG3FE4Erl4XzoLJM53ODF/8F8zPsn9nEqhMYf8CAwEAAaNTMFEwHQYDVR0OBBYEFCgSKecRHkH7Xaq5XrZHQRPHaLECMB8GA1UdIwQYMBaAFCgSKecRHkH7Xaq5XrZHQRPHaLECMA8GA1UdEwEB/wQFMAMBAf8wDQYJKoZIhvcNAQELBQADggEBACrwAmos1D/OyzYuoAk3bT6x5yFCn3+V4CFA8qice0L9ZhAkaMbJBOAatE6LpzsXHhV7z6MYkQ6WX4YKrGAhQjsr6YnWaTn6cBWAGqSzk/nVx/UYMkBOvpmC2GuVxBW4n9/SycCq1rWF/W4/x9v6hzZLhulLdeit3Z8XY3JVUe5ypQRzeEOZWvyLdLtXsWXJvYzmhUZPG1YhPIeWckBFUnw3uNt3fy32TJp1uCuaWoTwf4KAAEtUuZ44+UKnWfVyNPaKbEPeRYneMcAxmv1A9sAq3J5yXcYq5t1uXmkCdH67md3cYOYraRljXkCIC2/lRuuEWHyShlEx7Ry0ns24Lwg=
-----END CERTIFICATE-----
6) Click Continue.
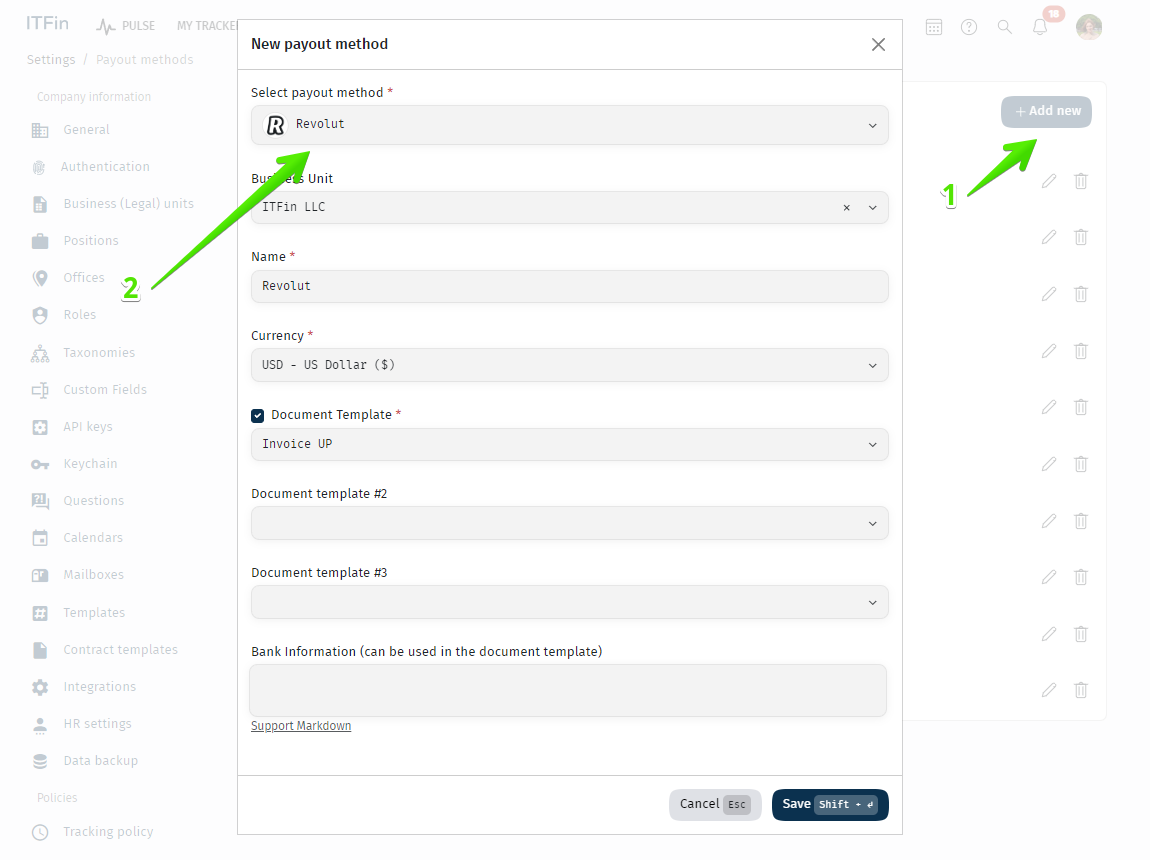
Step 2. Add a Company Payment Method
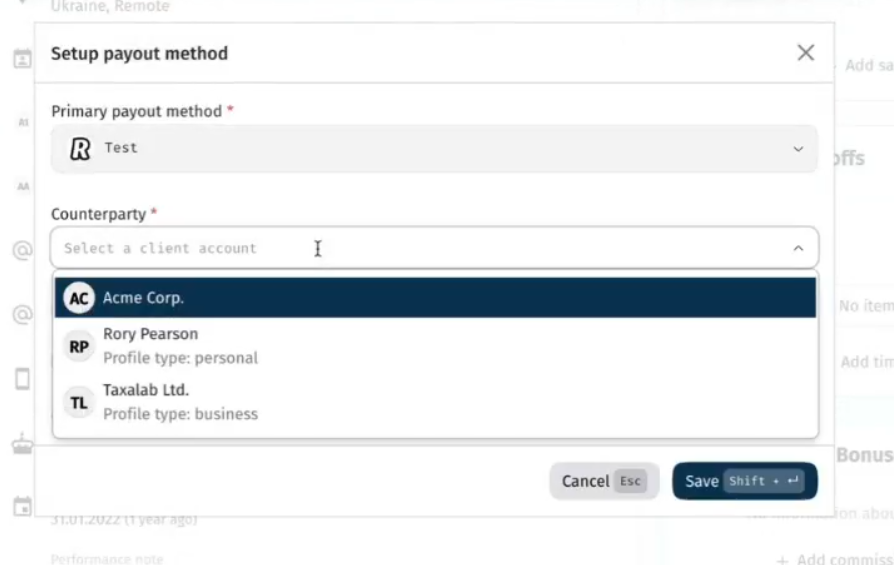
Step 3. Assign the Revolut Payment Method to Employees
The list of available counterparties is automatically synced from your Revolut account.
Step 4. Create Payments in Revolut
All employees assigned the Revolut payment method will appear on a separate tab in the Payment Sheet, where the Create payment option is available.
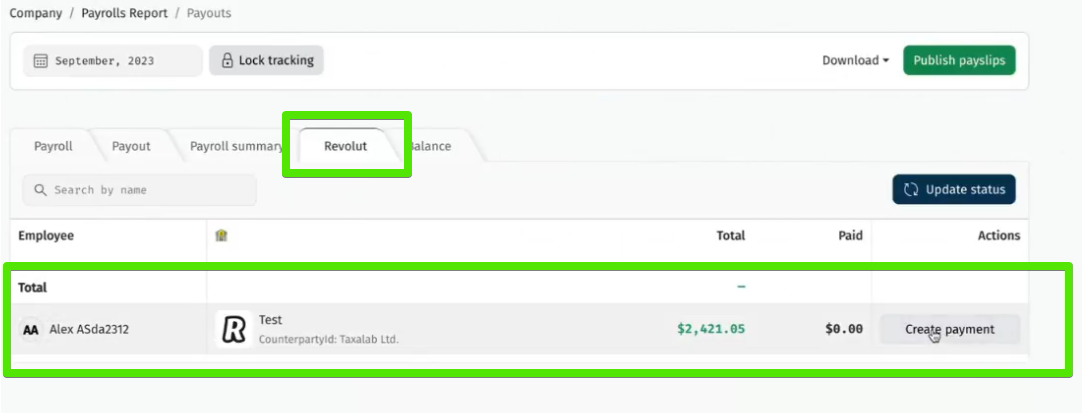
When you click Create payment, a payment draft is created in Revolut. In ITFin, the corresponding Payment ID will be displayed.
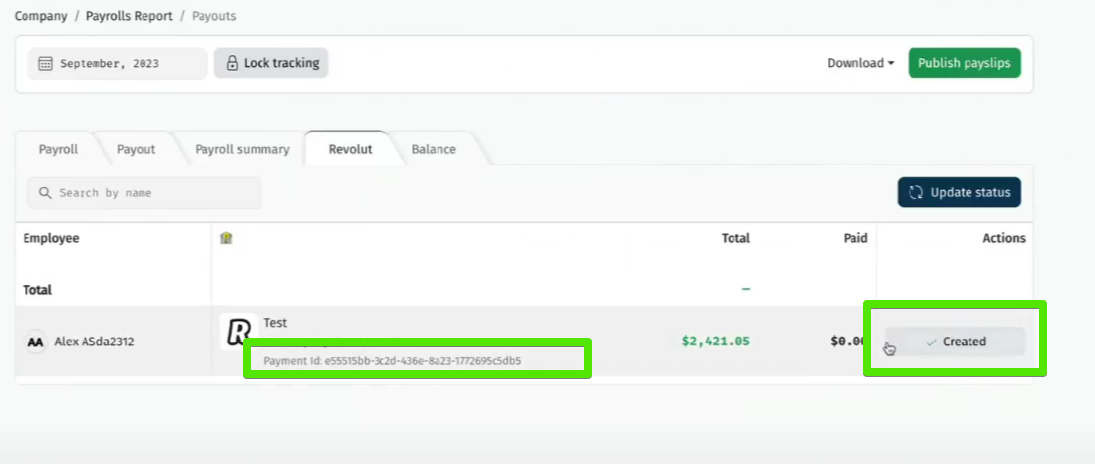
Clicking Created redirects you to Revolut, where you can review the payment draft and click Send funds to complete the payment.
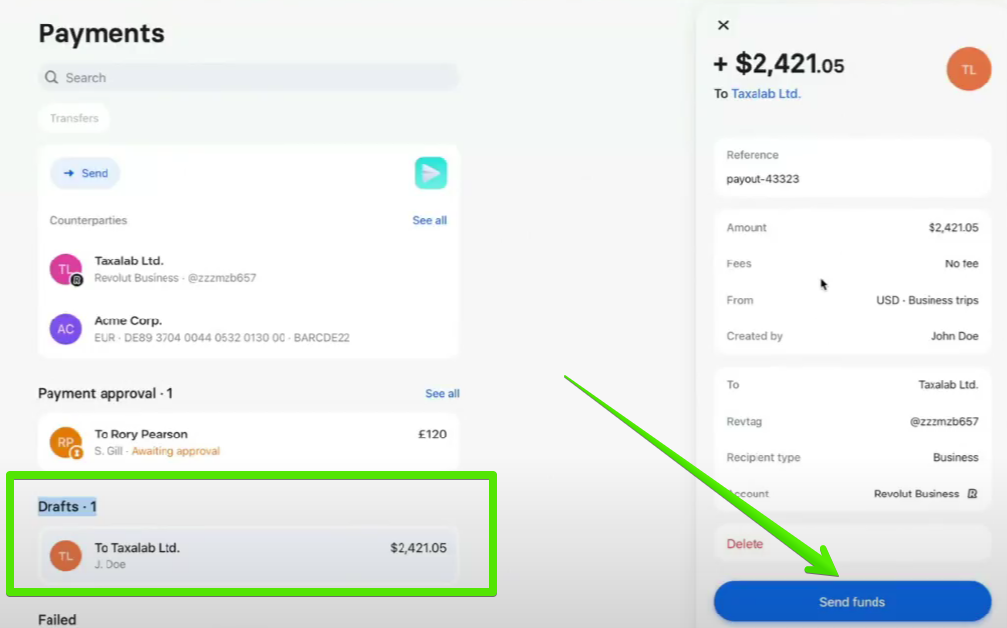
ITFin automatically checks payment statuses every hour. Once a payment has been sent, the paid amount will appear in the Paid column on the Revolut tab.
Alternatively, you can click Update status to manually synchronize the payment statuses.